2. Tools of the trade
C was a captain, all covered with lace;D was a drunkard, and had a red face.

onventional – static – fiction can be written using nothing more than pencil and paper, or typewriter, or word-processor; however, the requirements for producing IF are a little more extensive, and the creative process slightly more complex.
- For static fiction, you first write the text, and then you check it by reading what you’ve written.
- For IF, you still have to write all of the text, but you also have to establish what text gets displayed when. Once you have written the necessary Inform instructions, you use a compiler program to convert them into a playable format. The resulting information is played by an interpreter program, which permits you to interact with your developing world.
With static fiction What You Write Is What You Read, but with IF the format in which you initially write the game doesn’t bear much resemblance to the text which the interpreter ultimately displays. For example, the “William Tell” game, in the form that we wrote it, starts like this:
!============================================================================
Constant Story "William Tell";
Constant Headline
            "^A simple Inform example
             ^by Roger Firth and Sonja Kesserich.^";

Include "Parser";
Include "VerbLib";

!============================================================================
! Object classes

Class   Room
  has   light;

...
You will never need to look at it in the form produced by the compiler:
050000012C6C2C2D1EF6010A0C4416900010303230313031004253FEA90C0000
0000000000000000000000000000168F000000000000010200000000362E3231
...
but, as you’ll notice from the full transcript in Appendix C – “William Tell” story, the player will see the following:
The place: Altdorf, in the Swiss canton of Uri.  The year is 1307, at
which time Switzerland is under rule by the Emperor Albert of
Habsburg.  His local governor -- the vogt -- is the bullying Hermann
Gessler, who has placed his hat atop a wooden pole in the centre of
the town square; everybody who passes through the square must bow to
this hated symbol of imperial might...
Clearly, there’s more to writing IF than just laying down the words in the right order. Fortunately, we can make one immediate simplification: the translated form produced by the Inform compiler – those cryptic numbers and letters held in what’s known as the story file – is designed to be read by the interpreter program. The story file is an example of a “binary” file, containing data intended for use only by a computer program. Forget all that unreadable gibberish.
So that leaves just the first form – the one starting “Constant Story”
– which represents the tale written as a piece of IF. That’s the
source file (so called because it contains the game in its
original, source, form) which you create on your computer. The source file
is a “text” (or “ASCII”) file containing words and phrases which can be
read – admittedly after a little tuition, which is what this guide is all
about – by humans.
How do you create that source file? Using a third software program: an editor. However, unlike the compiler and interpreter, this program isn’t dedicated to the Inform system – or even to IF. An editor is an entirely general tool for creating and modifying text files; you’ve probably already got a basic one on your computer (an IBM PC running Windows comes with NotePad, while an Apple Macintosh has SimpleText or TextEdit), or you can download a better one from the Internet. An editor is like a word-processing program such as MS Word, only much less complex; no fancy formatting features, no bold or italics or font control, no embedded graphics; it simply enables you to type lines of text, which is exactly what’s needed to create an IF game.
If you look at the game source above, or in Appendix C – “William Tell” story, you’ll
notice Include "Parser"; and Include "VerbLib"; a few lines down
from the top of the file. These are instructions to the Inform compiler to
“include” – that is, to merge in the contents – of files called
Parser.h and VerbLib.h. These are not files which you have to
create; they’re standard library files, part of the Inform system.
All that you have to do is remember to Include them in every game that you
write. Until you’ve a fair understanding of how Inform works, you’ve no
need to worry about what they contain (though you can look if you want to:
they’re readable text files, just like the ones this guide will teach you
to write).
So, we’ve now introduced all of the bits and pieces which you need in order to write an Inform adventure game:
- a text editor program which can create and modify the source file containing the descriptions and definitions of your game. Although it’s not recommended, you can even use a word-processing program to do this, but you have to remember to save your game in Text File format;
- some Inform library files which you Include in your own game source file in order to provide the model world – a basic game environment and lots of useful standard definitions;
- the Inform compiler program, which reads your source file (and the library files) and translates your descriptions and definitions into another format – the story file – intended only for...
- an Inform interpreter program, which is what players of your game use. A player doesn’t require the source file, library files or compiler program, just the interpreter and the game in compiled format (which, because it’s a binary file not meaningful to human eyes, neatly discourages players from cheating).
All of those, apart from the editor, can be downloaded for free from the IF Archive. One approach is to fetch them individually, following the guidance on Graham’s page: visit http://www.inform-fiction.org/ and look for the “Software” section. However, if you’re using a PC or a Mac, you’ll find it easier to download a complete package containing everything that you need to get started.
Inform on an IBM PC (running Microsoft Windows)
Although the Windows operating system is upgraded on a fairly regular basis, its basic capabilities and ways of working have remained more-or-less consistent for many years. The information here applies to PCs running Windows 95 onwards.
Installing and testing Inform
Follow these steps:
Download http://www.firthworks.com/roger/downloads/inform_pc_env.zip to a temporary location on your PC.
Use a tool like WinZip to unzip the downloaded file, giving you a new
Informfolder. Move this folder (and its contents) to a suitable location on your PC – a good place would beC:\My Documents\Inform, but you could also useC:\Documents and Settings\yourname\My Documents\Inform,C:\InformorC:\Program Files\Inform. You should now have this set of folders: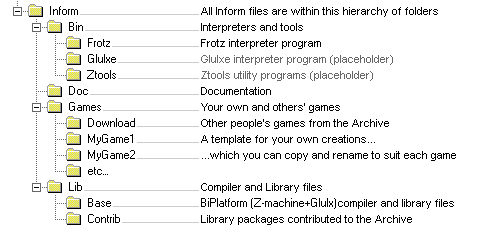
In order to make the download small and fast, these folders include just enough to get you started as an Inform designer – the compiler and interpreter programs, the library files, the
Ruins.infexample file from the Inform Designer’s Manual, and a template for your own first game. A few other folders are included as placeholders where you could later download additional components, if you wanted them. As soon as possible, you should download the Inform Designer’s Manual into theInform\Docfolder – it’s an essential document to have, and has been omitted from this download only because of its 3MB size.To verify that the downloaded files work properly, use Windows Explorer to display the contents of the
Inform\Games\MyGame1folder: you will see the two filesMyGame1.batandMyGame1.inf:
MyGame1.infis a tiny skeleton game in Inform source format. By convention, all Inform source files have an extension of .inf; Windows has an inbuilt definition for.inffiles, and so shows its Type as “Setup Information”, but this doesn’t seem to matter. If you double-click the file, it should open in NotePad so that you can see how it’s written, though it probably won’t mean much – yet.
MyGame1.batis an MS-DOS batch file (an old kind of text-only computer program, from the days before point-and-click interfaces) which runs the Inform compiler. Double-click it; a DOS window opens as the game compiles, and you’ll see this:C:\My Documents\Inform\Games\MyGame1>..\..\Lib\Base\Inform MyGame1 +include_path=.\,..\..\Lib\Base,..\..\Lib\Contrib | more Inform 6.30 for Win32 (27th Feb 2004) C:\My Documents\Inform\Games\MyGame1>pause "at end of compilation" Press any key to continue . . .
Press the space bar, then close the DOS window.
Note
On Windows NT, 2000 and XP, the DOS window closes of its own accord when you press the space bar.
A story file
MyGame1.z5has appeared in the folder; this is the compiled game, which you can play using an interpreter:
The extension of
.z5signifies that the story file contains a Z-machine game in Version 5 (today’s standard) format.Use Windows Explorer to display the contents of the
Inform\Bin\Frotzfolder, and double-clickFrotz.exe; the interpreter presents anOpen a Z-code Gamedialog box.Browse to display the
Inform\Games\MyGame1folder, and selectMyGame1.z5. ClickOpen. The game starts running in the Windows Frotz 2002 window.When you tire of “playing” the game – which won’t take long – you can type the QUIT command, you can select
File > Exit, or you can simply close the Frotz window.Using the same techniques, you can compile and play
Ruins.inf, which is held in theInform\Games\Downloadfolder. RUINS is the game used as an example throughout the Inform Designer’s Manual.
Setting file associations
The business of first starting the interpreter, and then locating the story
file that you want to play, is clumsy and inconvenient. Fortunately, when
you first run the Frotz interpreter, it automatically creates an
association with story files whose extension is .z5. From now on,
you’ll be able to play a game simply by double-clicking its story file. If
some any reason this doesn’t work, you can set up the association yourself:
- Double-click
MyGame1.z5; Windows asks you to select the program which is to open it:- type
Z-code V5 Adventureas the “Description for...“ - click to select “
Always use this program...“ - click
Other...
- type
- Browse to display the
Inform\Bin\Frotzfolder, and selectFrotz.exe. ClickOpen.
Changing the Windows icon
If the Windows icon that’s displayed alongside MyGame1.z5 doesn’t look
right, you can change it.
In Windows Explorer, either select
View > Options...and clickFile Types, or selectTools > Folder Options...and clickFile Types:- select the game file type in the list, which is in order either of application (Frotz) or of extension (Z5)
- click
Edit...
In the
Edit File Typedialog, clickChange Icon.In the
Change Icondialog, ensure that the file name isInform\Bin\Frotz\Frotz.exe, and select one of the displayed icons. ClickOKto close all the dialogs. The files in the folder should now look like this:
Compiling using a batch file
You can view – and of course change – the contents of MyGame1.bat,
the batch file which you double-click to run the compiler, using any text
editor. You’ll see two lines, something like this (the first chunk is all
on one long line, with a space between the MyGame1 and the
+include_path):
..\..\Lib\Base\Inform MyGame1
            +include_path=.\,..\..\Lib\Base,..\..\Lib\Contrib | more
pause "at end of compilation"
These long strings of text are command lines – a powerful interface method predating the icons and menus that most computer users know. You won’t need to master the command line interface in order to start using Inform, but this section will tell you what these particular command lines are doing. There are four parts to the first line:
Informrefers to the compiler program, and..\..\Lib\Baseis the name of the folder which contains it (addressed relative to this folder, the one which holds the source file). Double-dots stand for “go to the parent folder”.MyGame1is the name of the Inform source file; you don’t need to mention its extension of.infif you don’t want to.+include_path=.\,..\..\Lib\Base,..\..\Lib\Contribtells the compiler where to look for files likeParserandVerbLibwhich you’ve Included. Three locations are suggested: this folder, which holds the source file (.\); the folder holding the standard library files (..\..\Lib\Base); the folder holding useful bits and pieces contributed by the Inform community (..\..\Lib\Contrib). The three locations are searched in that order.Note
On the command line, you sometimes also see a compiler switch such as
-S, used for controlling detailed aspects of how the compiler operates. Rather than do that here, we find it more convenient to place any necessary switches at the very top of the source file, as we’ll explain in the next chapter.| morecauses the compiler to pause if it finds more mistakes than it can tell you about on a single screen, rather than have them scroll off the top of the MS-DOS window. Press the space bar to continue the compilation.
The second line – pause "at end of compilation" – just prevents the
window from closing before you can read its contents, as it otherwise would
on Windows NT, 2000 and XP.
You’ll need to have a new batch file like this to match each new source
file which you create. The only item which will differ in the new file is
the name of the Inform source file – MyGame1 in this example. You
must change this to match the name of the new source file; everything else
can stay the same in each .bat file that you create.
Getting a better editor
Although NotePad is adequate when you’re getting started, you’ll find life much easier if you obtain a more powerful editor program. We recommend TextPad, available as shareware from http://www.textpad.com/; in addition, there are some detailed instructions at http://www.onyxring.com/informguide.aspx?article=14 on how to improve the way that TextPad works with Inform. The biggest single improvement, the one that will make game development dramatically simpler, is being able to compile your source file from within the editor. No need to save the file, switch to another window and double-click the batch file (and indeed, no further need for the batch file itself): just press a key while editing the file – and it compiles there and then. You can also run the interpreter with similar ease. The convenience of doing this far outweighs the small amount of time needed to obtain and configure TextPad.
Inform on an Apple Macintosh (running OS X)
Whereas our instructions for using Inform on a PC apply to just about all versions of Windows, on the Macintosh we need to be more precise. Our guidance here is specifically for Mac OS X, rather than for its predecessor OS 9, and it may be helpful if we first mention a few relevant differences.
Mac OS X is a robust system constructed around – or on top of – BSD [1] UNIX. There are several kinds of applications that will run on your Mac OS X:
- Aqua: specifically designed for the Graphical User Interface of Mac OS X,
and taking advantage of its underlying technologies. Broadly, there
are two types of Aqua application:
- Cocoa: built with programming tools designed for Mac OS X.
- Carbon: built with the programming tools designed for Mac OS 9 and earlier versions, but “translated” to take advantage of OS X.
- Classic: designed to work on Mac OS 9 and earlier versions. They need to run in the Classic environment of OS X; roughly speaking, Classic is an emulation of the older Mac systems.
- X11: based on a windowing system designed for the UNIX/Linux world. They need an X-Windows server to run, and their appearance and functionality may seem a lot different to what the Aqua user expects.
- UNIX: most UNIX programs (including Linux) will run on your Mac OS X, but they usually have to be accessed (or configured) from the UNIX core of your Mac, through the Terminal utility.
These differences may be significant, since some of the tools designed to develop and run IF on a Mac system (for example, ones you’ll find in the Archive) have been built by programmers working in different environments with varying technologies. We have tried to select tools that will make your life easy as a beginner, but in time you may want to investigate alternative approaches.
Installing and testing Inform
Follow these steps:
Download http://www.firthworks.com/roger/downloads/inform_macosx_env.sit to a temporary location on your Mac.
Use a tool like StuffIt Expander to unpack the downloaded file (if your system configuration is standard, a mere double-click will make it self-extract at the current location, if it hasn’t already expanded all by itself). You’ll now have a new
Informfolder. Move this folder (and its contents) to a suitable location in your Mac.Note
It is a good idea for now to place it in your home directory; otherwise, a few pre-configured items may not work as explained. Once you learn the basics of the configuration, you may move the Inform folder to a different location and hack all the defaults like the professionals do.
You should now have this set of folders:
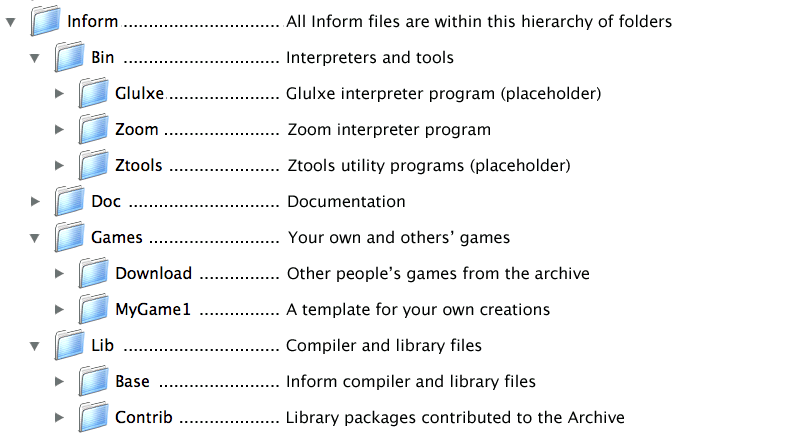
In order to make the download small and fast, these folders include just enough to get you started as an Inform designer – the compiler and interpreter programs, the library files, the
Ruins.infexample from the Inform Designer’s Manual, and a template for your own first game, which you may copy and rename each time you begin a new Inform project. A few other folders are included as placeholders where you could later download additional components, if you wanted them. As soon as possible, you should download the Inform Designer’s Manual into theInform/Docfolder – it’s an essential document to have, and has been omitted from this download only because of its 3MB size.To verify that the downloaded files work properly, use the Finder to display the contents of the
Inform/Games/MyGame1folder: you will see the filesMyGame1.commandandMyGame1.inf:
MyGame1.infis a tiny skeleton game in Inform source format. By convention, all Inform source files have an extension of.inf. However, Mac OS X may show its Kind as “FUJI BAS IMG document”, and try to open it with GraphicConverter. If you’re not a regular user of FUJI BAS IMG documents, you’ll probably want to change this. Either:- right-click on the file (or Ctrl-click)
- select
Open withand chooseOther...
- in the
Open withdialog, go to theApplicationsfolder and select TextEdit. - click to select “
Always open with“ - click
Open.
or:
- right-click on the file (or Ctrl-click)
- press Option, select
Always open withand chooseOther... - in the
Open withdialog, go to theApplicationsfolder and select TextEdit. - click
Open.
Now, if you double-click the file, it should open in TextEdit so that you can see how it’s written, though it probably won’t mean much – yet.
Note
The above process may affect only this specific file. To change the program that opens by default all
.inffiles, try this:- right-click on the file (or Ctrl-click)
- select
Get Info - in the
Open withtab, select TextEdit as the application - click the
Change All...button, and confirm the change when asked.
MyGame1.commandis a Terminal Shell Script (a UNIX executable command-line file, a kind of text-only computer program from the days before point-and-click interfaces) which runs the Inform compiler. Double-click it; a UNIX window opens as the game compiles, and you’ll see something like this (the working path will reflect your folder hierarchy):Last login: Sat Jul 3 03:07:51 on ttyp1 Welcome to Darwin! /Users/Dave/Inform/Games/MyGame1/MyGame1.command; [Hal:~] Dave% /Users/Dave/Inform/Games/MyGame1/MyGame1.command; exit Inform 6.30 (27th Feb 2004) logout [Process completed]Todo
Verify this output. It’s what’s in the PDF, but the command prompt looks like it’s in the wrong place.
A story file
MyGame1.z5has appeared in the folder; this is the compiled game, which you can play using an interpreter:
The extension of
.z5signifies that the story file contains a Z-machine game in Version 5 (today’s standard) format.Use the Finder to display the contents of the
Inform/Bin/Zoomfolder, and double-clickZoom; the interpreter presents anOpendialog box.Browse to display the
Inform/Games/MyGame1folder, and selectMyGame1.z5. ClickOpen. The game starts running in the Zoom window.When you tire of “playing” the game – which won’t take long – you can type the QUIT command, you can select
Zoom > Quit Zoom, or you can simply close the Zoom window.
Setting file associations
The business of first starting the interpreter, and then locating the story
file that you want to play, is clumsy and inconvenient. Fortunately, when
the system first “sees” the Zoom interpreter (which is a nice Aqua
application) it automatically creates an association with story files whose
extension is .z5 (and with other Infocom formats). From now on, you’ll
be able to play a game simply by double-clicking its story file.
The files in the folder should now look like this:

Compiling using a command-line file
If you have followed these instructions to configure your system, every
time that you need to compile your source code you just have to
double-click on the file MyGame1.command. However, this file is good
only for this folder and for MyGame1.inf.
If you want to start coding another game, you may copy the folder
MyGame1 with all its contents and rename it as you please (for example,
MyGame2 or something more appropriate). Inside the folder, you’ll also
want to rename the relevant files:
MyGame1.infmight becomeMyGame2.inf, orMobyDick.inf, or...
MyGame1.commandwould change to match:MyGame2.command, orMobyDick.command.
You can view – and of course change – the contents of
MyGame2.command, the command file which you double-click to run the
compiler, using any text editor. You’ll see two lines, something like this
(the second chunk is all on one long line, with a space between the
MyGame1 and the +include_path):
cd ~/Inform/Games/MyGame1/
../../Lib/Base/inform630_macosx MyGame1
                  +include_path=./,../../Lib/Base,../../Lib/Contrib
These long strings of text are command lines – a powerful interface method
predating the icons and menus that most computer users know. You won’t
need to master the command line interface in order to start using Inform,
but this section will introduce you to a few basic concepts to get your
bearings. The first line changes the working directory to
~/Inform/Games/MyGame1/. The command cd (also known as chdir,
short for “Change Directory to”) lets you travel to the desired folder,
specified by the path, in this case: ~/Inform/Games/MyGame1/. The
~ symbol stands for your home directory. That is, if your user name
were Dave, the above path is equal to:
/Users/Dave/Inform/Games/MyGame1/
You want to change that line so that it reads: cd
~/Inform/Games/MyGame2/
There are three parts to the second line:
inform630_macosxrefers to the compiler program, and../../Lib/Baseis the name of the folder which contains it (addressed relative to this folder, the one which holds the source file). Double-dots stand for “go to the parent folder”.MyGame1is the name of the Inform source file; you don’t need to mention its extension of.infif you don’t want to. You’ll want to change this to match the name of your new file:MyGame2.+include_path=./,../../Lib/Base,../../Lib/Contribtells the compiler where to look for files likeParserandVerbLibwhich you’ve Included in the source file (this may sound confusing now, but it will make a lot of sense after you’ve delved a bit deeper into this Guide). Three locations are suggested, separated by commas: this folder, which holds the source file (./); the folder holding the standard library files (../../Lib/Base); the folder holding useful bits and pieces contributed by the Inform community (../../Lib/Contrib). The three locations are searched in that order.Note
On the command line, you sometimes also see a compiler switch such as
-S, used for controlling detailed aspects of how the compiler operates. Rather than do that here, we find it more convenient to place any necessary switches at the very top of the source file, as we’ll explain in the next chapter.
Once you’ve finished editing those lines, Save the file (not
SaveAs), overwriting the original, and make sure that your text editor
doesn’t append an extension like .txt (TextEdit, the default editor
that comes with OS X, is polite enough to ask you about this).
You’ll need to have a new command file like this to match each new source
file which you create. The only item which will differ in the new file is
the name of the Inform source file – MyGameN. You must change this to
match the name of the new source file; everything else can stay the same in
each .command file that you create.
Making your own command-line file
There are two peculiarities by which your system understands that
MyGame1.command is a Terminal Shell Script. One is the extension
.command, and the other is an attribute of the file which marks it as
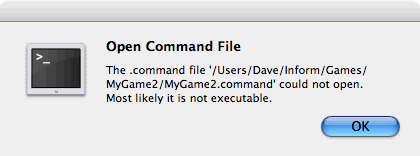
“executable” (the “executable bits”). If it doesn’t meet both conditions,
MyGame1.command won’t run as it should. You have to be careful when
editing this file: if you were, for instance, to open it in a text editor
and save it to a different location with a different name, the executable
bits might get lost, and when you double-click it, you would see:
To make a command file from scratch (also, to fix this problem) you can follow these steps:
Open any text editor and write (using your own path):
cd ~/Inform/Games/MyGameN/
../../Lib/Base/inform630_macosx MyGameN
              +include_path=./,../../Lib/Base,../../Lib/Contrib
where
MyGameNstands for the name you have chosen for your Inform project.Save the file in the folder
MyGameNand call itMyGameN.command. Make sure that the text editor doesn’t append a.txtextension; if it does, rename the file manually.Go to
Applications > Utilitiesand double-click onTerminal. This opens the utility which provides you with a set of windows to access the UNIX command line. Supposing the computer is named Hal, and the user Dave, you should see something like this:Last login: Wed Jun 30 18:05:55 on ttyp1 Welcome to Darwin! [Hal:~] Dave%
Every time that you open a Terminal window, you’re at your home directory (as noted by the tilde after the computer’s name). You can travel to your working folder by typing:
cd Inform/Games/MyGameN
You’ll see how the path changes:
[Hal:~/Inform/Games/MyGameN] Dave%
Now you can make the command file executable with:
chmod 777 MyGameN.command
Alternatively, you can omit the cd command if you give the full path to
chmod:chmod 777 ~/Inform/Games/MyGameN/MyGameN.command
This sets the executable bits for the file
MyGameN.command.Close the Terminal window.
Now, every time you need to compile your game, you can just double-click on
MyGameN.command from the Finder.
Getting a better editor
Although TextEdit is adequate when you’re getting started, you’ll find life much easier if you obtain a more powerful editor program. We’d really like to recommend one – there’s an exciting list of possibilities at http://osx.hyperjeff.net/Apps/apps.php?sub=5 – but at the time of writing none of them seems outstandingly suited to IF authorship. If you find one that works really well, please let us know.
More about the editor
As well as the ones that we recommend, other good text editors are listed
at http://www.firthworks.com/roger/editors/. One feature that’s well worth
looking out for is “hotkey compilation” – being able to run the compiler
from within the editor. Another is “syntax colouring”, where the editor
understands enough of Inform’s syntax rules to colour-code your source
file; for example: red for brackets, braces and parentheses [ ] { }
and ( ), blue for reserved words like Object and print, green
for items in quotes like ‘...’ and ”...”, and so on. Syntax colouring is
of great assistance in getting your source file correct and thus avoiding
silly compilation errors.
More about the compiler
The Inform compiler is a powerful but undramatic software tool; it does an awful lot of work, but it does it all at once, without stopping to ask you any questions. Its input is a readable text source file; the output is a story file, also sometimes known as a Z-code file (because it contains the game translated into code for the Z-machine, which we describe in the next section).
If you’re lucky, the compiler will translate your source file into Z-code; perhaps surprisingly, it doesn’t display any form of “success” message when it succeeds. Often, however, it fails, because of mistakes which you’ve made when writing the game. Inform defines a set of rules – a capital letter here, a comma there, these words only in a certain order, those words spelled just so – about which the compiler is extremely fussy. If you accidentally break the rules, the compiler complains: it refuses to write a Z-code file. Do not worry about this: the rules are easy to learn, but just as easy to break, and all Inform designers inadvertently do so on a regular basis. There’s some additional information about dealing with these mistakes, and about controlling how the compiler behaves, in Compiling your game.
More about the interpreter
One of the big advantages of the way Inform works is that a compiled game – the Z-code story file – is portable between different computers. That’s not just from one PC to another: exactly the same story file will run on a PC, a Mac, an Amiga, UNIX workstations, IBM mainframes, PalmOS hand-helds, and on dozens of other past, present and future computers. The magic that makes this happen is the interpreter program, a software tool which pretends to be a simple computer called a Z-machine. The Z-machine is an imaginary (or “virtual”) computer, but its design has been very carefully specified, so that an expert programmer can quite easily build one. And that’s exactly what has happened: a Macintosh guru has built an Inform interpreter which runs on Apple Macs, a UNIX wizard has built one for UNIX workstations, and so on. Sometimes, you even get a choice; for popular machines like the PC and the Mac there are several interpreters available. And the wonderful thing is: each of those interpreters, on each of those computers, is able to play every Inform game that’s ever been written and, as a surprise bonus, all of the classic 1980s Infocom games like “Zork” and “The Hitchhiker’s Guide to the Galaxy” as well!
(Actually, that last sentence is a slight exaggeration; a few games are very large, or have pictures included within them, and not all interpreters can handle this. However, with that small pinch of salt, it’s pretty accurate.)
That’s enough waffling: let’s get started! It’s time to begin designing our first game.
Footnotes
| [1] | “BSD” stands for Berkeley Software Distribution, the name of the UNIX derivative distributed in the 1970s from the University of California, Berkeley, and used collectively for the modern descendants of those distributions. |